Getting Started on Cloud Computing
Workshop Overview
- What is Cloud Computing (10 min)
- Setting up a machine in the cloud (10 min)
- Connecting to a remote system (10 min)
- Moving around and looking at things (20 min)
- Writing and reading files (20 min)
- Run your own code (Python/R/Java) + Break (40 min)
- Long running and scheduled programs (20 min)
- System Management and Installation (10 min)
- Conclusion
What is Cloud Computing
Early days of computing
- Large, very expensive computers
- Punchcards, printouts on paper
- Shared by many users
The Terminal (late 70's)
- Big innovation: keyboard and screen
- Actual computation was still performed on the mainframe
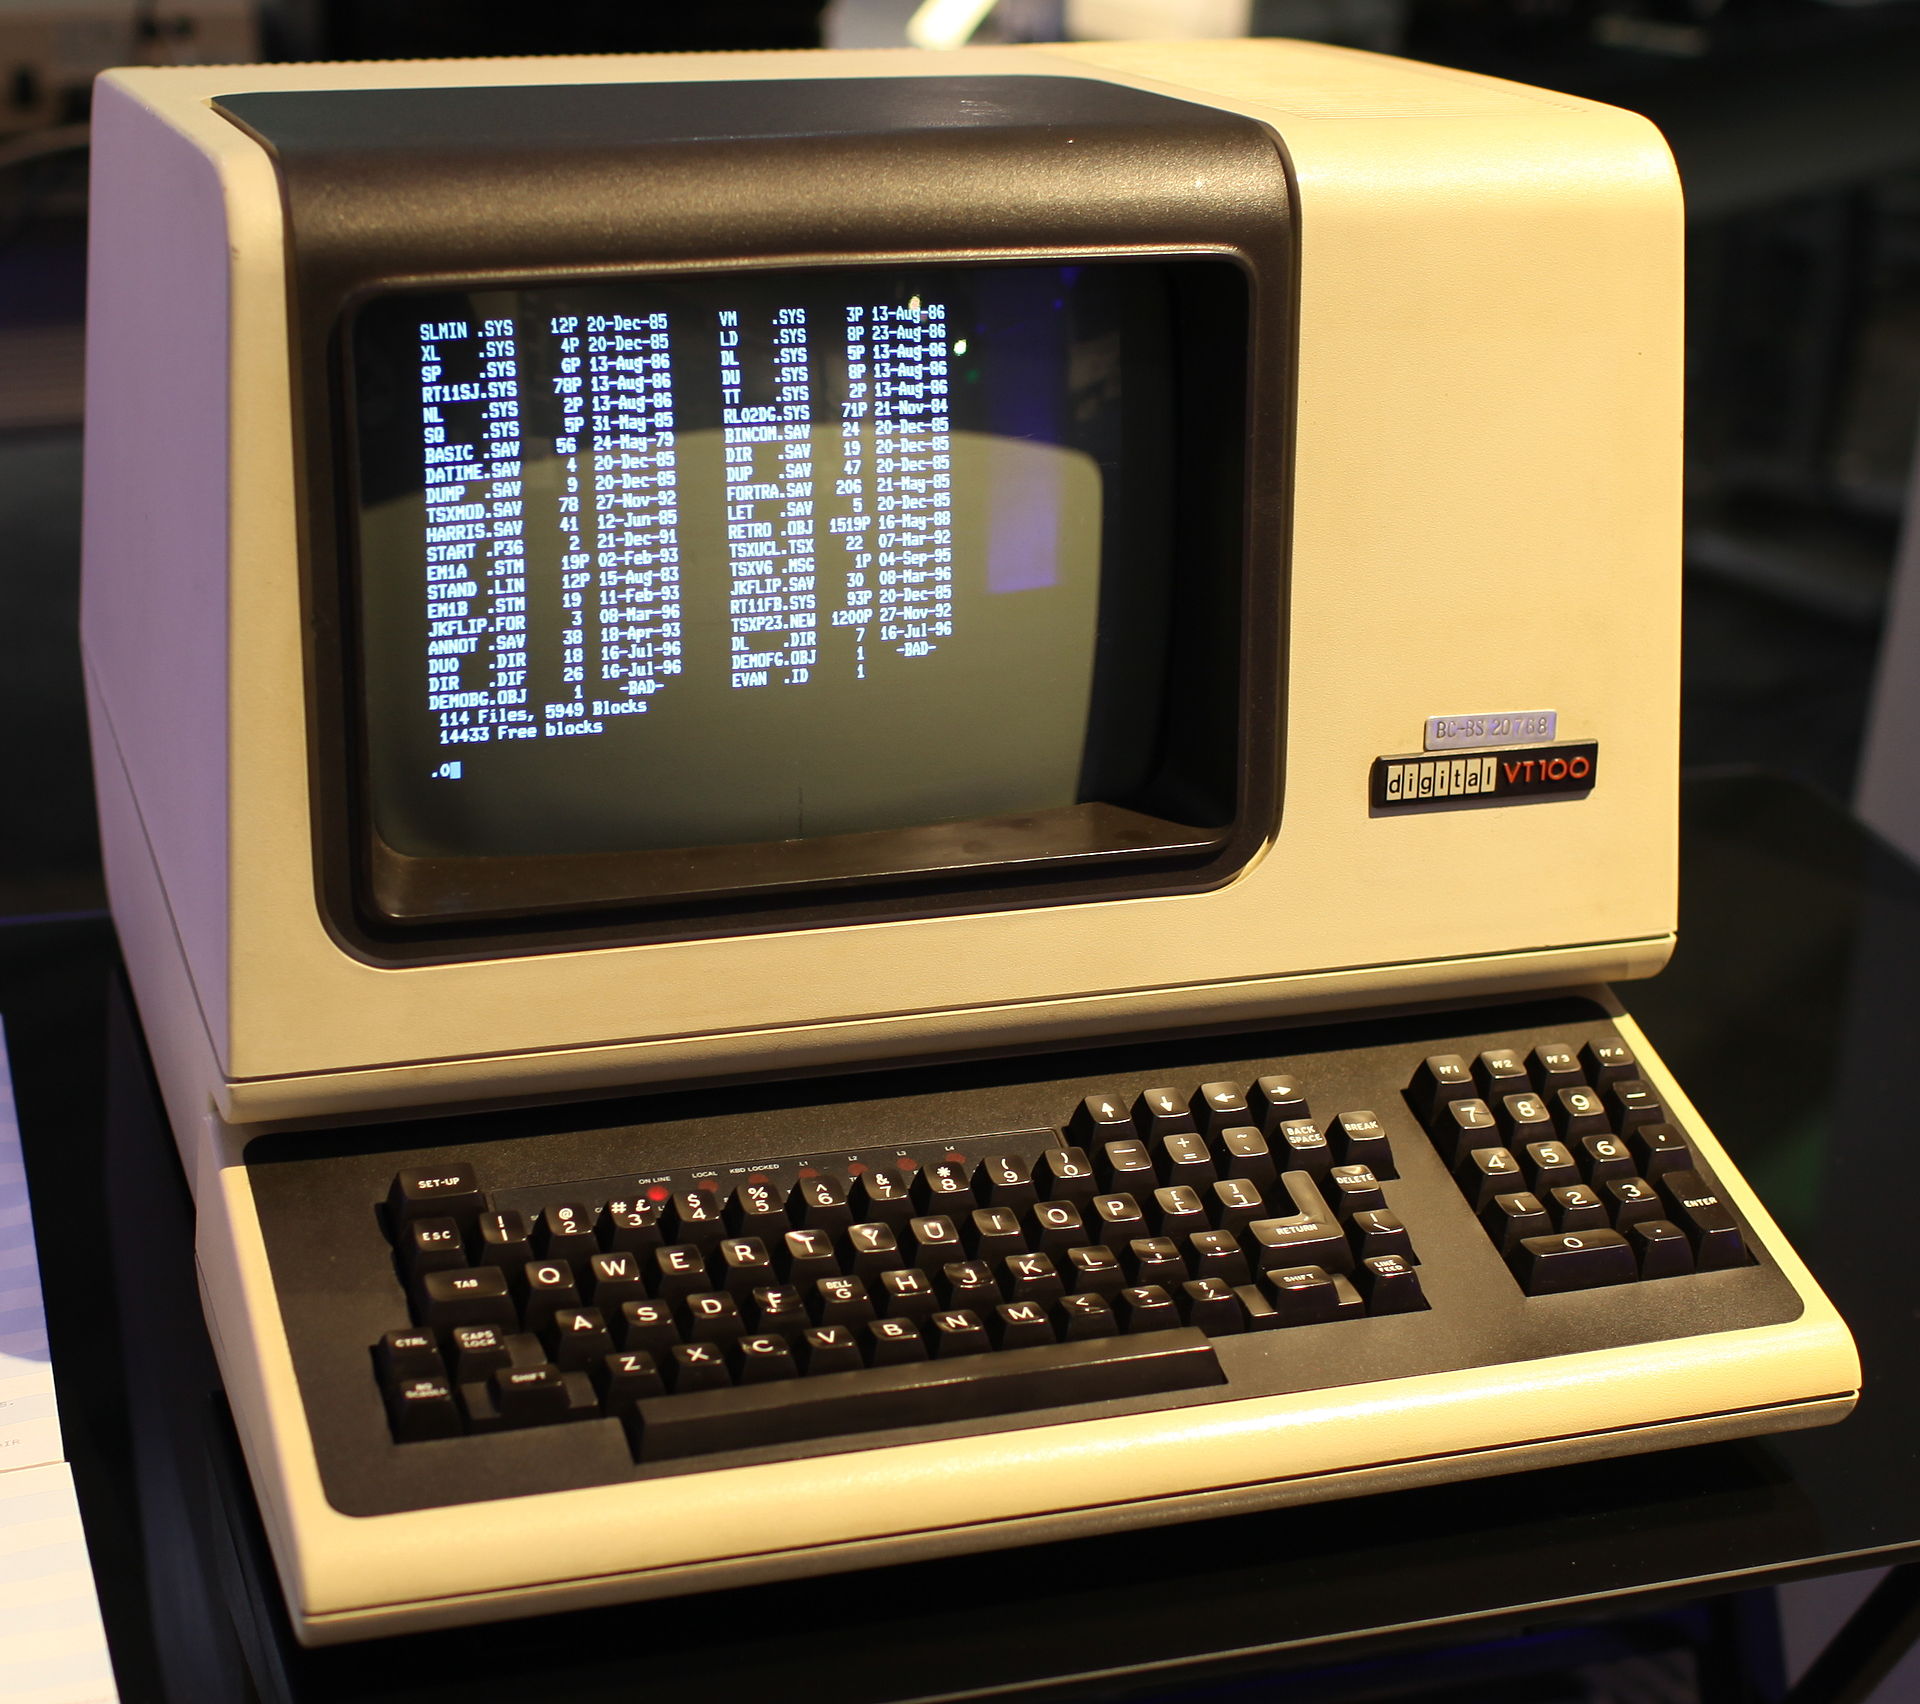
Courtesy of Jason Scott (CC BY 2.0)
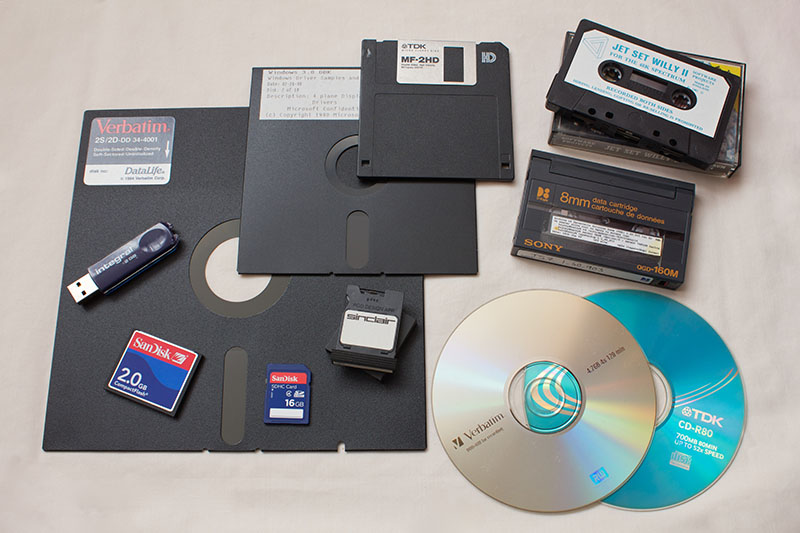
Personal Computers (80's)
- Data no longer centralized on a main frame, but on all kinds of storage media
- Drawback: multiple version of your data, which one is the true one?
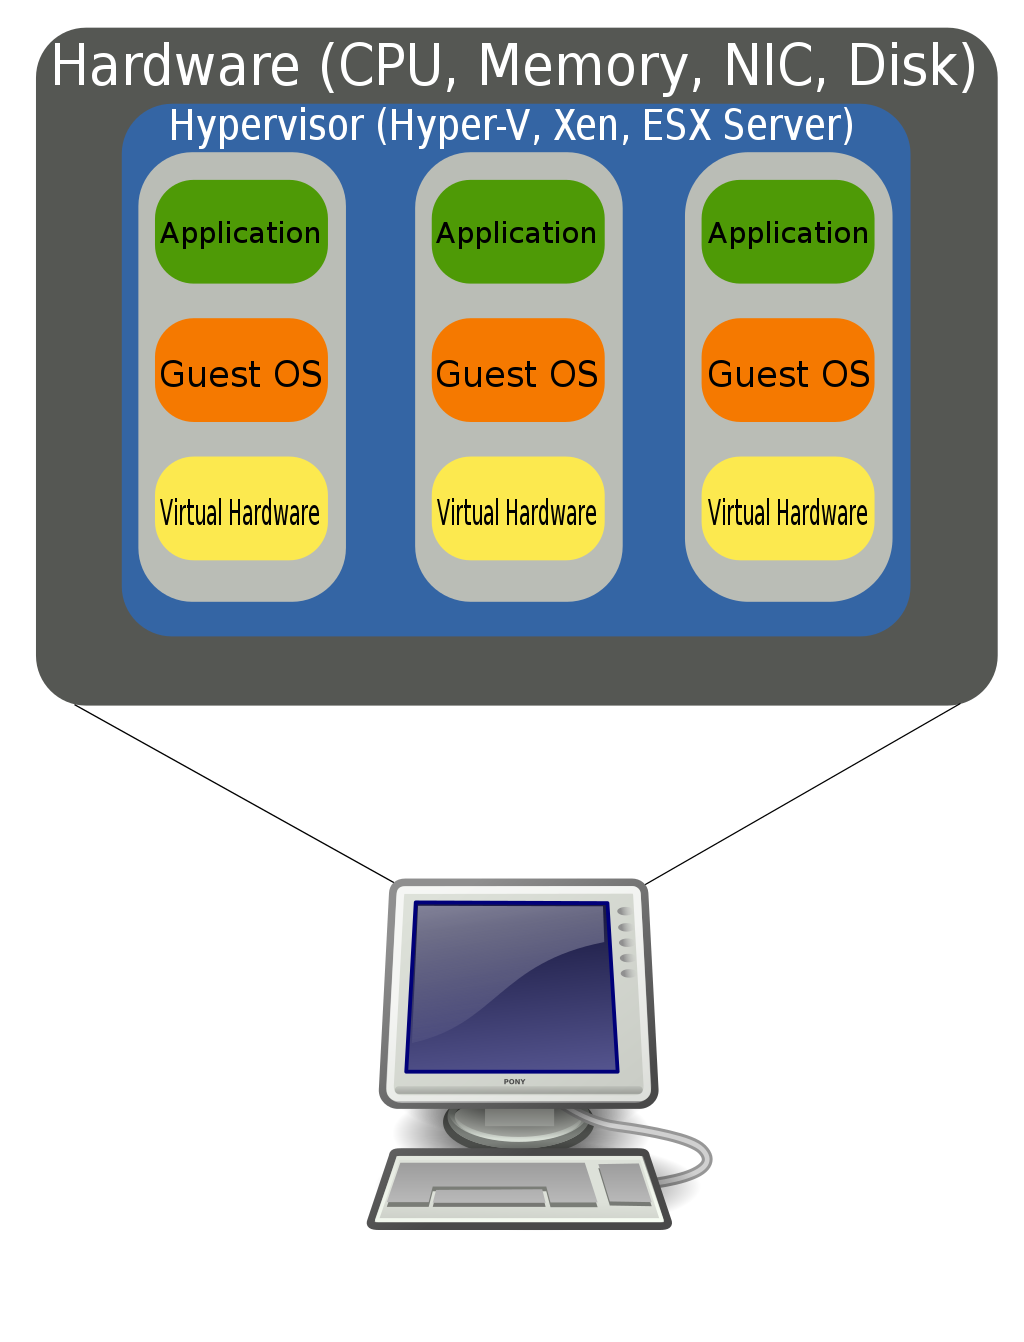
Virtualization
- Computers became fast enough to act like they are multiple virtual computers
- Big advantage is that companies can exploit economies of scale
The Cloud
Some typical advantages:
- Centralization : have one logical place that contains the true version of your data.
- Outsourcing : let companies who have the expertise handle your IT and focus on your core bushiness competencies.
- Scalability : using virtualization you can get the most out of your resources.
Typical cloud services:
- Software-as-a-Service (SaaS) : centralized software, e.g. Office 365, Google Docs, Overleaf
- Infrastructure-as-a-Service (IaaS) : virtual machines, servers, foundation used for many cloud services.
Setting up a machine in the cloud
Example with Azure

Machine properties
CPU/RAM (size), Operating System, Machine name
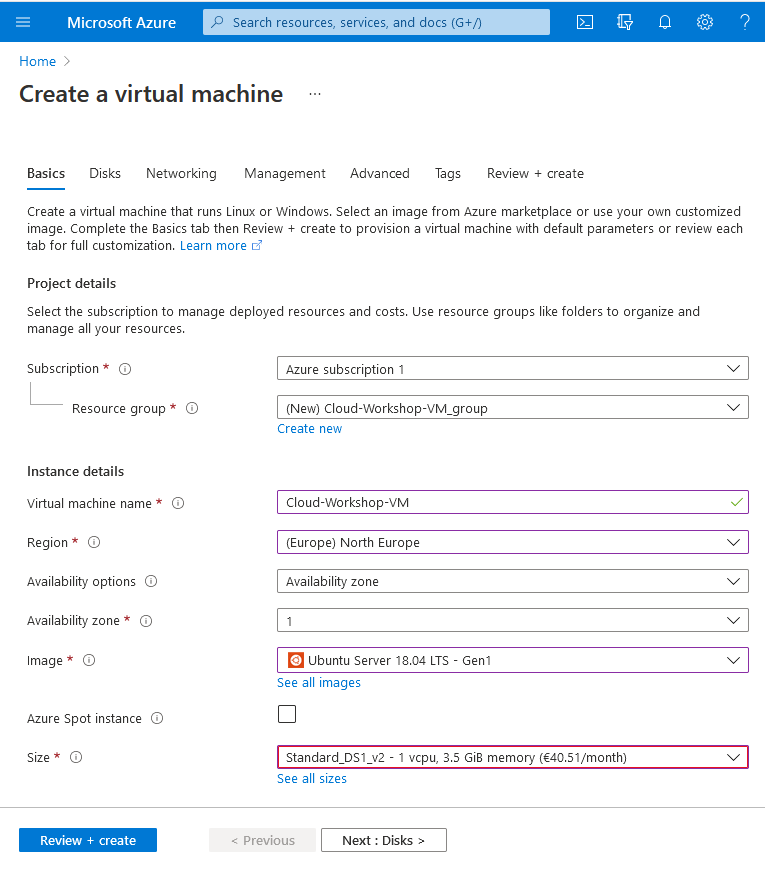
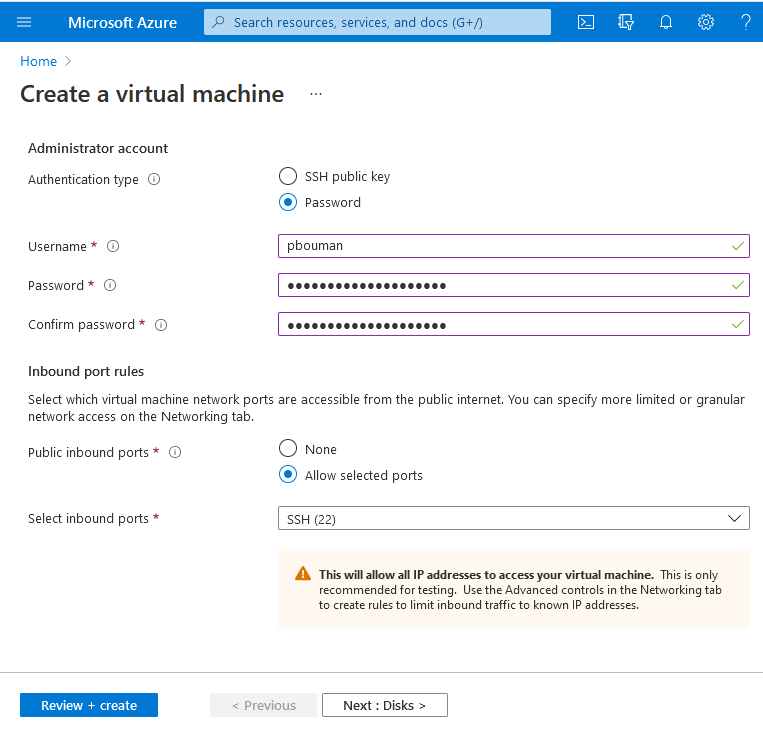
Administrative User
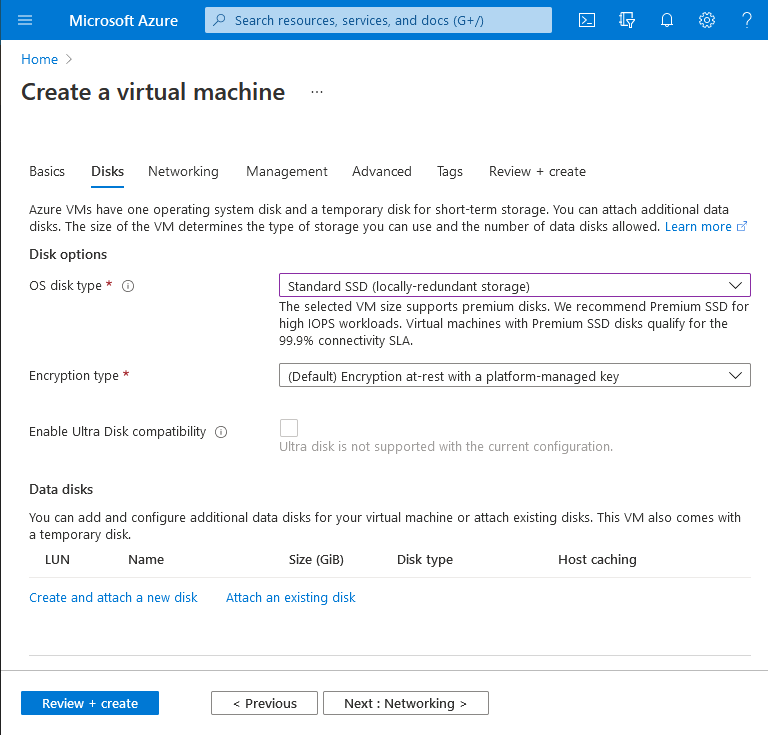
Storage
If the default storage is not enough (storage typically incurs a fee as well)
Confirm
The machine is only created after we confirm

Ready
After a few moments, the machine is now ready to use
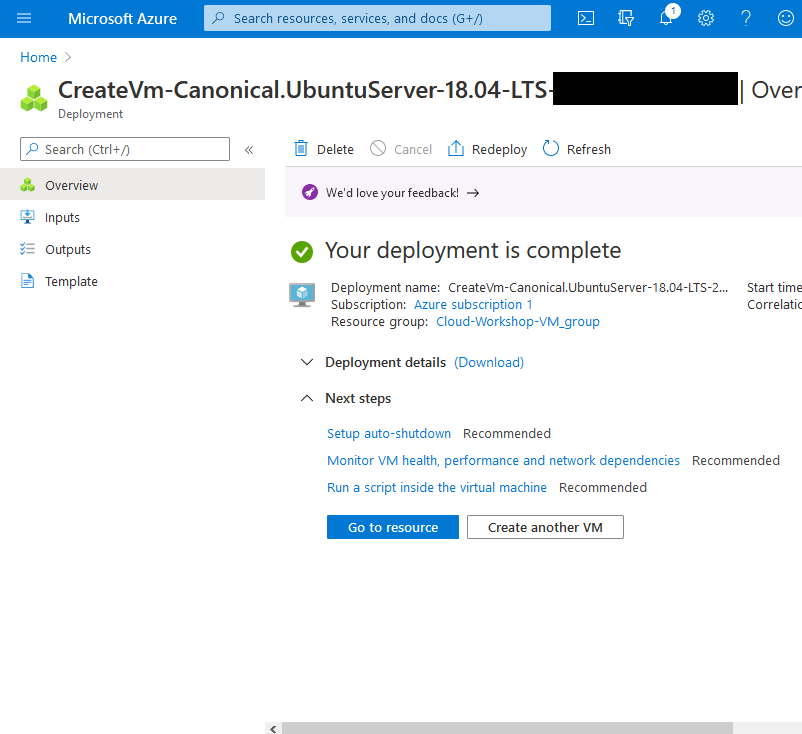
Landing page
Information needed to connect, and stop/delete the machine
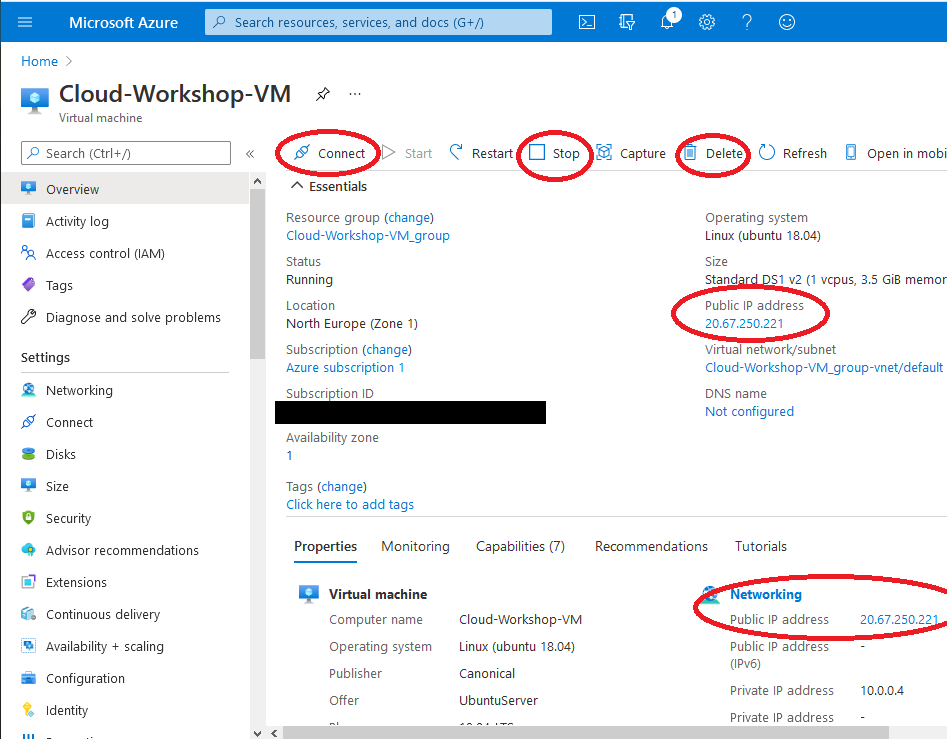
Cleanup / Avoid unexpected costs
When you stop/delete machine, make sure all resources are deleted
- Running virtual machines
- Disks and storage space
- Networking (traffic, IP addresses, hostnames)
- Monitoring and Analytics services
Why Linux/Unix command line?
- Very common Operating System for servers, cloud computing and scientific computing
- A workshop on controlling Windows via Remote Desktop is not very interesting
- Windows has license costs, virtual machines running it are typically more expensive
- Command lines are very flexible and can be automated more easily than visually clicking buttons
However, use the right tool for the right job! Command lines are very useful, but they are no silver bullet.
Connecting to a remote system
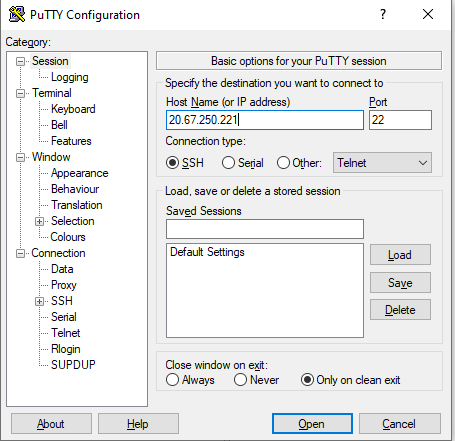
Windows / PuTTY - Step 1 (Connecting)
Windows / PuTTY - Step 2 (Accept Certificate, enter username and password)
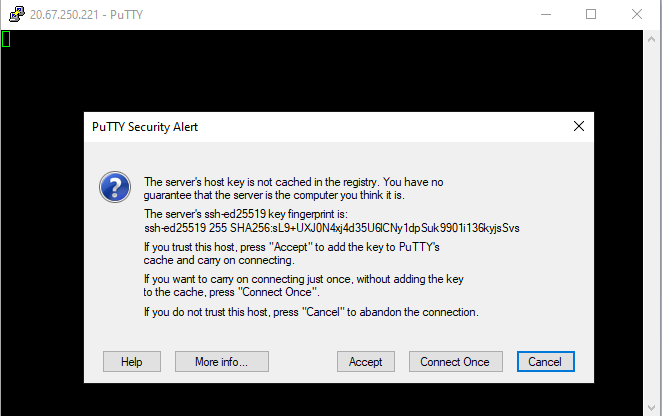
Note: use the right mouse button to paste. You don't get feedback while typing the password.
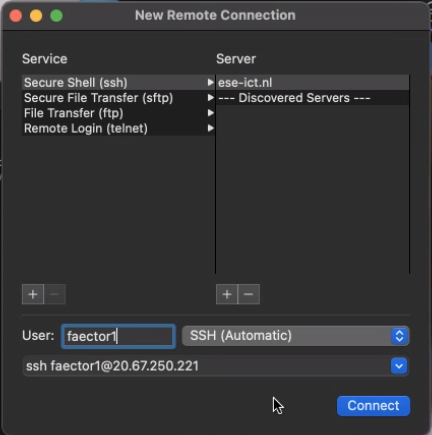
Mac OS - Step 1
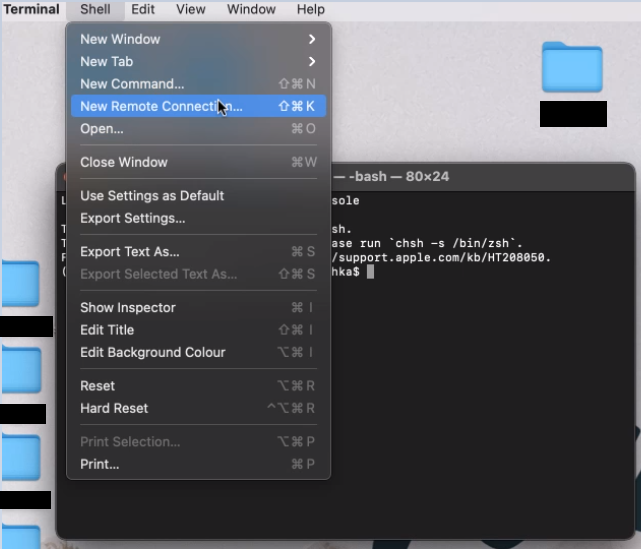
Mac OS - Step 2
Under Secure Shell (ssh) use the server's IP or hostname. Fill in your username.
Mac OS - Step 3
Type the word yes and press enter
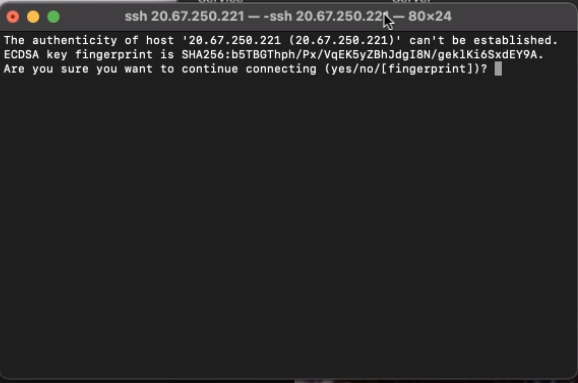
Note: use the right mouse button to paste. You don't get feedback while typing the password.
Success
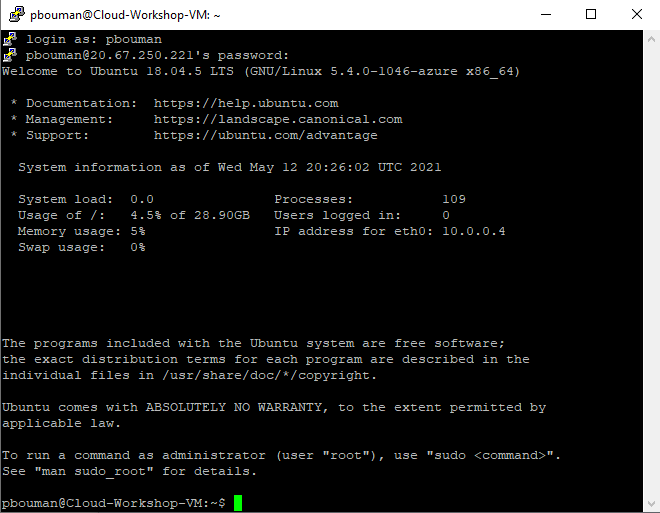
The $ indicates you can start typing commands.
Moving around and looking at things
First things first
You will have to type in a lot of commands. Be clever!
- The
$indicates the shell is waiting for a command. Type a command and press ↵ to execute it. - The Tab key can often be used to autocomplete long filenames, paths, commands. Try to use it often, don't be shy!
- The ↑ key can be used to go back to previous commands and edit them. If you go back too far, the ↓ key can be used to go forward in history.
From this ...
... to this ...
... or even this
Important Commands
| Command | Action |
|---|---|
whoami |
Print your username |
pwd |
Print current working directory |
cd name |
Move to directory called name |
cd .. |
Move up one directory |
mkdir name |
Creates a directory called name |
ls |
List files in current working directory |
ls -l |
List files in current working directory (long format) |
ls --help |
Help for the ls command |
man ls |
Read the manual of the ls command. Quit by pressing Q |
tree -L 2 |
Shows a file and directory tree of depth 2. |
Writing and reading files
Dealing with files
- Creating/Editing them
- Viewing their contents
- Moving/renaming them
- Deleting them
- Download a file from the internet
Important Commands
| Command | Action |
|---|---|
nano file |
Opens a file called file in the nano editor. Save your edits with Ctrl+O and quit nano with Ctrl+X |
cat file |
Print the contents of the file called file to the terminal |
mv from to |
Move or rename a file called from to new location or name to |
rm file |
Delete a file called file |
rm -rf dir |
Delete director called dir and all files and subdirectories it contains. Be very careful with this! |
wget url |
Download the file specified by URL url and save it as a file |
head -n 5 file |
Shows the first 5 lines of file |
tail -n 5 file |
Shows the first 5 lines of file |
less file |
Read file interactively. Exit by pressing Q |
Run your own code (Python/R/Java)
Writing Programs for the Command Line
- Standard Out: letting your program write to the Standard Out with
print()(Python/R),cat()(R) orSystem.out.println()(Java) will make it appear on terminal. - Standard In: letting a program read from the Standard In with
prompt()(Python),scan(file=stdin,...)(R) or reading fromSystem.in(Java) will make the program read in what the user is typing into the terminal while the program is running. - Standard Error: similar to standard out, but for errors. Not covered in this episode.
- Command line arguments: arguments passed when running a program from the command line can be accessed as a list/array/vector of strings called
sys.argv(Python),commandArgs(trailingOnly=TRUE)(R) or theString [] argsargument of a Java main-method. - Argument parser libraries make it very easy to define and access command line arguments from within your program.
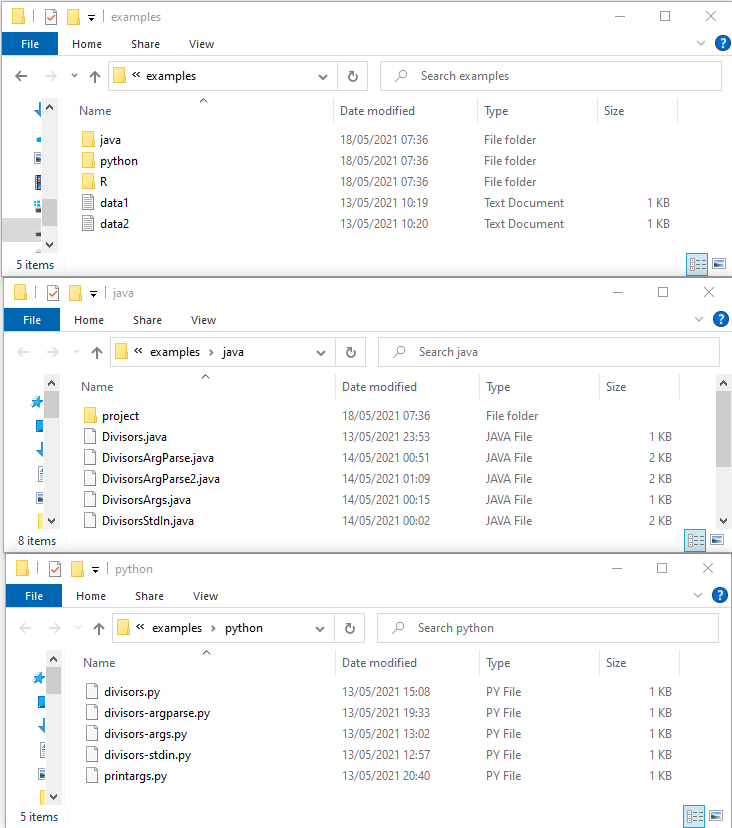
Simple program
- Input: an upper bound (integer) and a list of divisors (integer)
- Output: a list of integers between 1 and the upper bound that are divisible by all of the divisors.
- Example: upper bound: 100, divisors: 3, 5 should give the output 15, 30, 45, 60, 75, 90
Important Commands
| Command | Action |
|---|---|
python3 file |
Run the python code in file with the Python interpreter |
Rscript file |
Run the R code in file with the R interpreter |
javac files |
Compile one or multiple .java source code files to .class bytecode files. |
java ClassName |
Run the program starting from the main method in class ClassName |
command < file |
Runs command and sends the contents of file to the standard in of that process as if someone was typing it into the terminal while that process is running. |
nano file |
Opens a file called file in the nano editor. Save your edits with Ctrl+O and quit nano with Ctrl+X |
less file |
Read file interactively. Exit by pressing Q |
Long running and scheduled programs
Scheduling Commands
- A tool called
croncan be used to periodically execute commands, defined by lines in acrontab - Example 1 :
*/5 * * * * myCommandrunsmyCommandevery five minutes - Example 2 :
0 12 1 * * myCommandrunsmyCommandon the first day of each month - You can use an online tool such as Crontab Generator to generate the lines for the crontab, or write them yourself.
Keeps command running while you disconnect
- Once you close your SSH connection, programs currently running will be stopped.
- You can avoid this by running your programs in one or more virtual terminals to which you can detach and reattach with the
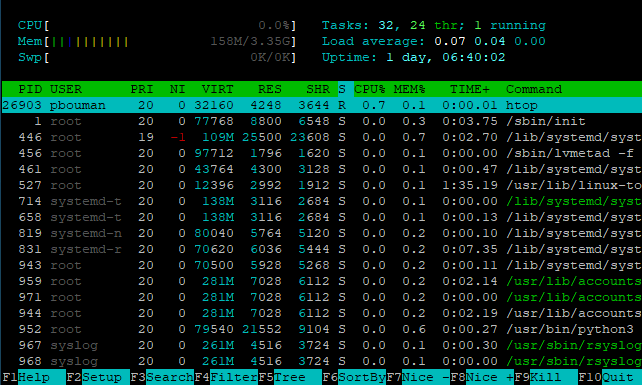
tmuxutility. - Keep an eye on your resource consumption! This can be done conveniently with the
htopprogram.
Important Commands
| Command / Keys | Action |
|---|---|
crontab -e |
Edit your user's cron table that specifies scheduled tasks |
date |
Prints the current date and time |
tmux new -s name |
Create a new virtual terminal session with name name |
tmux |
Create a new virtual terminal session |
tmux ls |
List existing tmux virtual terminal sessions |
tmux detach or press Ctrl + B, then D |
Detach from the current virtual terminal |
tmux attach -t name |
Enter the virtual terminal sessions called name |
tmux kill-session -t name |
Ends the virtual terminal session called name. This ends all programs running in it. |
exit |
Leaves the virtual terminal (if inside one). Closes the connection if you perform it in the shell directly. |
htop |
Check resource consumption. Press F10 or click F10Quit to exit.
|
System Management and Installation
Administration tasks
- Not all tasks can be executed by regular users. If you have insufficient permissions, you can perform
sudo commandto perform a command with administrative rights. (Not possible during the workshop) - Package managers such as
aptfrom Debian/Ubuntu based system andyumfor Redhat based systems can be used to install software, similar to app stores for your phone. - On the server you can use
apt searchto search for packages that you could install if you had super-user rights - For some software (such as R) you may have to add repositories with additional packages.
Conclusion
Final Remarks
- Two more episodes you can play around with yourself.
- Episode 11 focuses is on combining commands on the terminal, connect them via standard in, standard out.
- Episode 12 focuses on writing shell scripts, running certain commands for each file in a directory.
- The server will remain available a bit longer, feel free to keep experimenting.
- If installed, you can use many of the commands you learned in a local terminal as well!